You rely on your sump pump to keep your basement dry, so noticing a sump pump leaking can feel frustrating and a bit worrying. What starts as a small drip can quickly point to worn parts, pressure issues, or hidden damage inside the system. If ignored, it may lead to moisture buildup or even water damage. Here you’ll understand what’s causing the leak, how to spot early warning signs, and what you can do to fix it before it gets worse.
Why Is the Sump Pump Leaking?
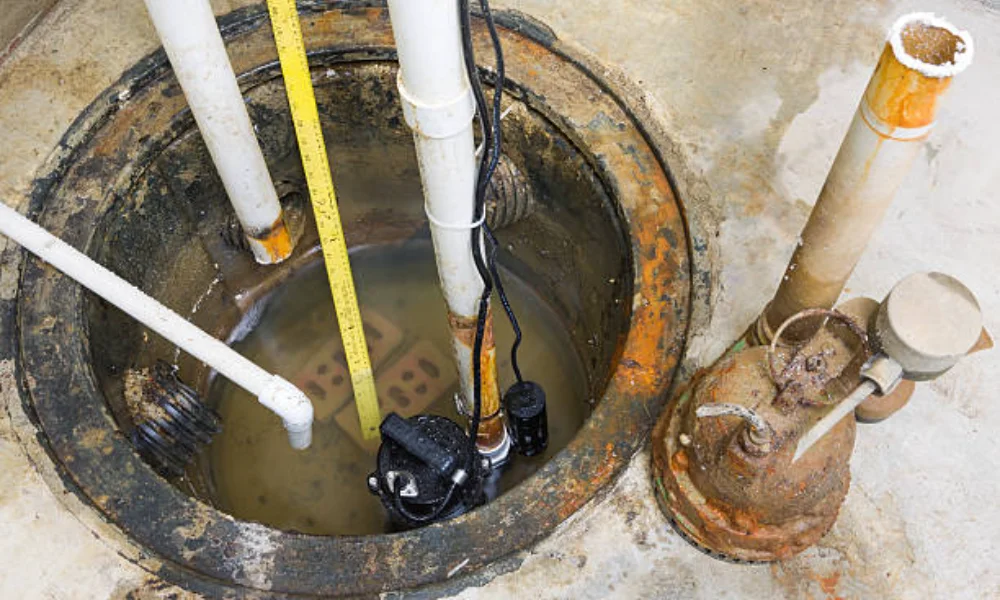
A sump pump usually leaks when internal components wear down or when external connections fail. Over time, pressure, vibration, and moisture exposure affect pipes, seals, and the pump body. Small gaps can allow water to escape, which then spreads around the pit area. Identifying the exact source helps you avoid bigger repairs and keeps the system working reliably.
Here are key reasons why sump pump leaks:
Loose or Damaged Discharge Pipe Connections
The discharge pipe carries water away from your home, but joints can loosen due to vibration. Even slight misalignment allows water to drip or spray out. If fittings crack or threads wear down, the connection weakens further. Regular inspection helps catch these early before leaks expand.
Cracked Pump Housing or Basin
The pump housing and basin hold water under pressure. Over time, material stress or freezing temperatures can cause cracks. These cracks may start small but gradually widen. Once that happens, water leaks continuously during operation and weakens the system.
Worn Seals or Gaskets
Seals and gaskets prevent water from escaping between moving parts. However, constant use causes them to dry out or deteriorate. As they lose flexibility, water begins to seep through gaps. This issue often develops slowly but leads to noticeable leaks.
Check Valve Failure
The check valve stops water from flowing back into the pit. When it fails, water reverses direction and builds pressure. This added strain can cause leaks at joints or near the pump. You may also hear water flowing back after the pump stops.
Improper Installation or Alignment
If the system was not installed correctly, leaks may appear sooner than expected. Poor alignment stresses pipes and fittings. Over time, this stress creates weak points where water escapes. Even a new pump can leak if installation issues are not corrected.
Signs Your Sump Pump Leak Is Getting Worse
Leaks rarely stay the same. They tend to worsen as components degrade or pressure builds. Recognizing warning signs early helps you act before major damage occurs. These signs often appear gradually but should never be ignored.
Water Pooling Around the Pump
If you notice standing water near the sump pit, the leak has likely spread. This pooling can damage flooring and promote mold growth. Persistent moisture also increases humidity, which affects indoor air quality.
Pump Running More Frequently Than Normal
A leaking system may cycle more often because water keeps returning to the pit. This constant operation increases wear on the motor.
Eventually, the pump may fail earlier than expected due to overuse.
Unusual Noises During Operation
Grinding or rattling sounds often indicate internal damage or pressure imbalance. Leaks can contribute to these issues by affecting water flow. If the noise continues, internal components may already be under strain.
Musty Odors in the Basement
Leaks create damp conditions, which encourage mold and mildew growth. This leads to unpleasant smells in your basement. If ignored, these odors can spread to other areas of your home.
How to Fix a Sump Pump Leaking
Fixing a leak depends on the source, but most solutions focus on restoring tight connections and replacing worn parts. Acting quickly reduces the risk of structural damage and keeps your system efficient. Some fixes are simple, while others require professional tools and experience.
Tighten or Reseal Pipe Connections
Start by checking all visible pipe joints. Loose connections can often be tightened using basic tools. If the sealing material has worn out, applying new plumber’s tape or sealant helps stop minor leaks.
Replace Worn Seals or Gaskets
If seals appear cracked or brittle, replacement is necessary. New gaskets restore a tight seal and prevent further leakage. This step improves efficiency and reduces unnecessary water loss.
Inspect and Replace a Faulty Check Valve
A failing check valve should be replaced to prevent backflow. This not only stops leaks but also protects the pump from added strain. Proper installation ensures water flows in the correct direction.
Repair or Replace Cracked Components
Cracks in the housing or basin usually require replacement rather than repair. Temporary fixes rarely last under pressure. Installing a new component ensures long-term reliability.
Call a Professional for Persistent Leaks
If the leak continues despite basic fixes, professional help is the safest option. Experts can diagnose hidden issues and ensure proper installation.
You can also learn more about proper system performance in this helpful guide on how often a sump pump should run during heavy rain, which explains normal behavior and warning signs.
How to Prevent Sump Pump Leaks
Schedule Regular Sump Pump Inspections
Routine inspections do more than spot visible leaks. A trained technician checks discharge lines, float switches, seals, and electrical connections for early wear. They also test system response under load, which reveals hidden issues that are easy to miss. This approach helps you avoid sudden failures and keeps the pump operating within safe limits.
Test the Pump Periodically
Testing your sump pump confirms it responds correctly when water levels rise. Pouring water into the pit should trigger a smooth start, steady drainage, and a proper shut-off cycle. If the pump hesitates, runs longer than expected, or struggles to clear water, it may indicate internal wear or reduced efficiency that needs attention.
Keep the Pit Clean and Free of Debris
Dirt, gravel, and small debris often collect in the sump pit over time. These materials can block the intake screen or interfere with the float mechanism, which affects how the pump operates. A clean pit allows water to flow freely, reducing unnecessary strain on the motor and internal components.
Replace Aging Components Before Failure
Sump pump parts such as seals, check valves, and switches wear out gradually due to constant exposure to moisture and pressure. Replacing these components before they fail helps maintain consistent performance and prevents unexpected leaks. If you are unsure when to replace the sump pump, consider both its age and how often it runs, as frequent cycling accelerates wear.
FAQs
When Should You Replace Your Sump Pump?
Knowing the time to replace the sump pump depends on usage and condition. Most systems last 7–10 years with proper care. If you notice frequent repairs, reduced efficiency, or recurring leaks, replacement is often the better choice.
Why Is My Sump Pump Leaking From the Bottom?
Leaks from the bottom usually point to a cracked basin or worn internal seals. This type of issue often requires replacing parts rather than performing simple repairs.
Is a Leaking Sump Pump an Emergency?
It depends on severity. Minor leaks can wait for scheduled repair, but active flooding or rapid pooling needs immediate attention. Ignoring urgent leaks can lead to basement damage and mold growth.
Call Roto-Rooter Plumbers for Durable Sump Pump Repair in Apple Valley, CA
A sump pump leaking can quickly turn into a serious problem if left unchecked. Small issues like loose connections or worn seals often grow into larger failures. Addressing them early protects your home and keeps your basement dry.
If your system shows signs of trouble or you are unsure about the cause, professional help makes a real difference. Roto-Rooter High Desert offers reliable inspection, repair, and replacement services tailored to your needs. Contact our team today to restore your sump pump’s performance and prevent future leaks.